Why you may need to filter out certain IPs
Real-Time Visitor Monitoring option allows you to see all visitors who are browsing your websites. Sometimes you or your company employees may also need to go to the website in order to help the customer out or for any other reason basically. When you do so, you will see your own IPs in the Visitors list and this may distort your understanding of how many actual customers you have on the website. These types of situations are when you can take advantage of the Real-Time Website Monitoring Filtering feature and exclude your office IPs from appearing in the Visitors list of your agent app.
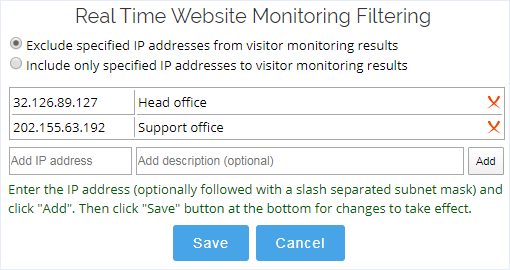
How to enable website monitoring filtering
- Open Account Settings / Visitor Monitoring Filtering page in your Control Panel
- Select one of the options: "Exclude specified IP addresses from visitor monitoring results" or "Include only specified IP addresses to visitor monitoring results"
- Enter the IP address
- Enter a description (optional) to let your colleagues know why this particular IP is included to or excluded from visitor monitoring
- Click the button "Add"
- Repeat steps 3 to 5 with as many IP addresses as you need to be included or excluded
- Click "Save" at the bottom of the page to confirm the changes.
How to exclude / include the whole subnet from monitoring results
Instead of excluding or including a single IP from monitoring results, you can also exclude/include a whole subnet by using a subnet mask slash notation.
You can read more information on how to configure a subnet mask here.
